
DE AutoDoc is a automated documentation tool.
The installer also
Please note the following points:
javaw.exe -jar "Installation-directory\AutoDocGUI.jar"as the link target in the respective dialog. Additionally, you can set the icon to the ".ico" file in the installation directory.
"javaw.exe" -jar "Installation-directory\AutoDocGUI.jar" -cfg "%1"
Since AutoDoc Version 1.2.8 Plugins for certain file types are supproted.
Using the GUI the installation is quite simple.
In order for this to work access to the internet should be possible and you should have write permission to the AutoDoc installation directory (maybe admin rights are neccessary).
In case you have to install the Plugin manually, this is the process.
    plugins/
        de.enache.AutoDoc.Plugin.SAS_EG/
            de.enache.AutoDoc.Plugin.SAS_EG.jar        (The plugin itself)
            de.enache.AutoDoc.Plugin.SAS_EG.plug_ini   (The plugin's parameter file)
            Dokumentation.txt                          (The plugin's documentation)
            LICENCE_GPL_V_3_0.txt                      (The plugin's licence)
You may need to have write permission to the AutoDoc installation directory (maybe admin rights are neccessary).
AutoDoc version 1.0.15 introduced a graphical user interface (GUI), which is currently in beta stadium.
The GUI version of AutoDoc can be started on graphical operating systems by
javaw -jar ProgDir/AutoDocGUI.jar
Then, the main window appears:
Here, all the parameters described in section AutoDoc Parameters can be entered.
The menu items are:
The parameters can be either entered directly into the text fields. Alternatively, for some parameters klicking on the "..." buttons opens dialogs to simplyfy the data entry.
For directories and file names, ther is additionally a check box "relative" available, where the user can specify, whether AutoDoc should use address the file or directory relative to the working directory or rather absolute.
The parameter settings can be saved and loaded. The file format is identical to the file format used in the -cfg parameter described in section Configuration File. Therefore, already available configuration files can be used.
When selecting "Run" from the "Process" menu, a dialog opens and AutoDoc is executed.
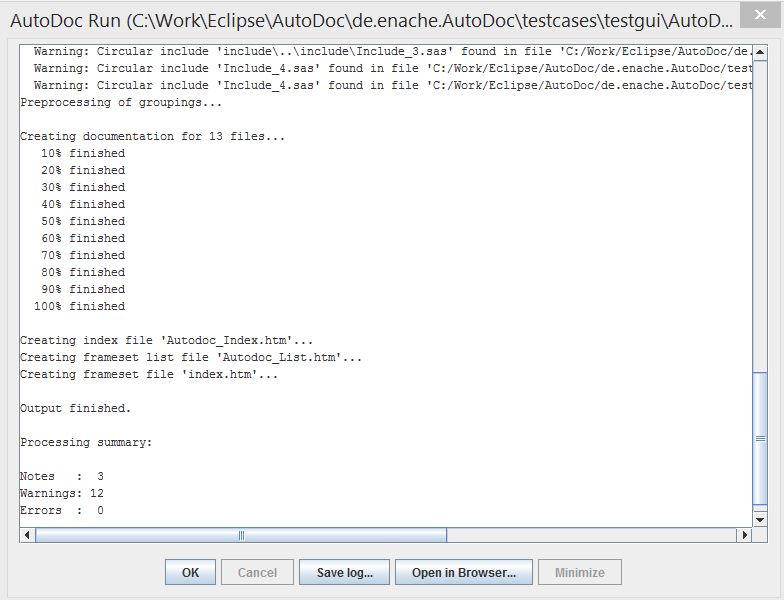
The "Run" dialog contains a log window, displaying all AutoDoc processing messages. In the command line version these messages are displayed on the console. A run can be cancelled by klicking the "Cancel" button or closing the dialog. The "Minimize" button enables you to minimize the run window, which is convenient for longer runs.
After the AutoDoc run has finished, the dialog can be closed by klicking "OK" or the contents of the log window can be saved to a file, or the generated output can be opened in the systems default browser.
The AutoDoc GUI program has two optional parameters:
For example, when the user wants to run the same configuration over and over again, he could save the configuration, for example as "C:\AutoDoc.adc" and then call the GUI with
javaw -jar ProgDir/AutoDocGUI.jar -cfg "C:\AutoDoc.adc"
Another example would be, if some of the parameters are always the same and some change. For example, when having stored company wide settings, like desing, logo, etc., as a template. Then one can use these template settings like
javaw -jar ProgDir/AutoDocGUI.jar -templ "C:\AutoDoc.adc"
and the change the different settings.
Basically, -cfg and -templ do exactly the same thing, except when it comes to saving the configuration again. When -cfg is used, klicking on "Save..." will save the parameters in the same file, whereas when -templ is used, the user will be prompted under which filename the parameters are to be saved to avoid overwriting the template accidentally.
The recommended file extension for AutoDoc configuration files is "adc", as in the previous examples. When AutoDoc has been installed with the Microsoft WindowsTM Installer, the extension "adc" is automatically associated with the AutoDoc GUI and double clicking in a "adc" file will start the GUI automatically loading the file (as with the -cfg parameter).
Of course, other extensions, like "cfg" or "ini" can be used with AutoDoc, but these are not associated by the installer. Also, when AutoDoc has been installed manually, the association with "adc" is not present.
The GUI property settings under "Configuration -> GUI Properties" enable you to change the following settings:
After the change of the GUI settings, it is neccessary to re-start AutoDoc GUI in order to make the settings effective. The settings are stored in user directory in the ".AutoDoc/GUISettings.txt" file. The location of the user directory depends on your operating system.
The GUI template setting corresponds to the -templ parameter. It is processed first, before the -templ is processed.
The other settings enable running the GUI in different languages. In the standard configurations only the two settings "en" for English and "de" for German can be choosen in the locale drop-down list.
But if you have added translations to the language specific files in the resource directory, you can use different languages. The recommended way to do this, is to make a copy of the whole resource sub-directory "res" of the AutoDoc distribution. Then make your changes and then point the GUI resource setting to this copy.
For example, if your AutoDoc distribution is located in C:\Programs\AutoDoc and you want to add a french translation, you can do it like this:
After the GUI has been re-started, it shows in the translated french language. If you want the AutoDoc output to be french as well, you have to change the settings "Resource Directors (-res)" and "Locale (-locale)" within the GUI to the same values.
Please note, that the ISO 639-1 language codes contain only two characters and have to be in lower case letters for AutoDoc to detect them correctly.
AutoDoc is a Java program. So, the first step is to make sure the Java Runtime Environment version 1.4 or higher is installed on your computer.
The program is shipped in a ZIP file. To install it, simply unzip it into a directory of your choice. In this documentation this program directory is reffered to as ProgDir.
When you call the program without command line parameters
java -jar ProgDir/AutoDoc.jar
the usage help will be displayed.
DE Autodoc - Automated documentation, (c) 2014 by Daniel Enache

Syntax: Autodoc -in Input-Dir -out Output-Dir [-workdir Directory] [-exclude Pattern] [-cfg File] [-locale str] [-outtype Type]
               [-ext Extension-Filter] [-extdef Definition] [-templatedir Directory] [-res Directory] [-styledef StyleDef] [-title Title]
               [-headins File] [-footins File] [-logo File] [-chm ProjName] [-recurse Flag] [-enablesearch flag]

  -in Input-Dir          Input directories
  -out Output-Dir        Output directory
  -workdir Directory     Working directory
                         (optional, default: Systems directory)
  -exclude Pattern       Pattern of input files to be excluded
                         (optional, default: "" = no exclusion)
  -cfg File              Configuration file
                         (optional, default: no file)
  -locale str            Locale country
                         (optional, default: "en")
  -outtype Type          Output type
                         (optional, "single" = one single file,
                          "noframes" = multiple files without frames,
                          "frames" = multiple files with frames,
                          "treeframes" = multiple files w. frames & tree index
                          "iframes" = multiple files with iframes,
                          "itreeframes" = multiple files w. iframes & tree index,
                          "latex" = simple LaTeX,
                          "pdflatex" = PDF LaTeX,
                          "epub" = Epub E-Book format)
  -ext Extension-Filter  File extension filter
                         (optional, default: "" = no filter)
  -extdef Definition     Marker definiton for a file extension.
                         This parameter is deprecated and will be removed.
  -templatedir Directory Template directory
                         (optional, default: "templates"
                         in program directory)
  -res Directory         Alternative AutoDoc ressource directory
                         (optional, default: use programs default)
  -styledef StyleDef     Style definition file to be used for output
                         (optional, default: "Autodoc.css"
                         in template directory for HTML output types and
                         "article" for LaTeX output types.)
  -title Title           Title to be used as Heading
                         (optional, default: "Documentation")
  -headins File          File to be added to the header
                         (optional, default: no file)
  -footins File          File to be added to the footer
                         (optional, default: no file)
  -logo File             Logo image file
                         (optional, default: no logo)
  -chm ProjName          Project name for CHM file generation
                         (optional, default: no chm file generation)
  -recurse Flag          Recurse input directories?
                         (optional, "yes" = recurse (default),
                           "no"  = do not recurse)
  -enablesearch flag     Activate search for HTML outputs?
                         (optional, "yes" = activate search,
                           "no"  = do not activate search (default))
The parameters -in and -out are required for the program to run successfully. Either you set them via the command line, e.g.
java -jar ProgDir/AutoDoc.jar -in "inputdir" -out "outputdir"
or in a configuration file, e.g. AutoDoc.cfg, includeg by the -cfg parameter
java -jar ProgDir/AutoDoc.jar -cfg "AutoDoc.cfg"
After invoking the program, it scans the input directory and all of it's sub-directories for files and creates the documentation in the directory specified as output directory. Output is only created for files containing the markup tags described in the Markup Documentation. More details on how to specify input and output directories in section Required Parameters.
As output file format currently HTML, LaTeX, and Epub are supported, but there are several options to customize the output. An example output may look like this in your Internet Browser (default output type "itreeframes"):
The configuration file is a simple text file. Each parameter is on one line and the parameter name and the corresponding setting are separated by a =. The names of the parameters are the same as on the command line but without the dash (-).
More details about the configuration file and how to used it can be found in section Configuration File Parameters.
As described in the Introduction, the parameters for the input and output directories are required. Typically, they are given on the command line using the -in and -out parameters. Although the directories do not need to be enclosed in quotes, it is recommended, in case they contain special characters, like blanks.
java -jar ProgDir/AutoDoc.jar -in "c:\inputdir" -out "c:/outputdir"
In this example, we have used absolute directory names. Java is tolerant concerning the directory separator on Windows environments. You can use both the backslash or the slash. On Unix environments you must use the regular slash:
java -jar ProgDir/AutoDoc.jar -in "/user/home/inputdir" -out "/user/home/outputdir"
You can also use relative directory names, but in this case you have to make sure, to start AutoDoc in the desired working directory. The easiest way to accomplish this ist to write a batch file or shell script for this purpose.
cd mydirectory
java -jar ProgDir/AutoDoc.jar -in "input" -out "output"
In this example, the inputs from the sub-folder "input" in the current working directory "mydirectory" are scanned and the output is written to the "output" sub-directory in the current working directory.
AutoDoc also supports Windows network paths (UNC), as in the following example.
java -jar ProgDir/AutoDoc.jar -in "\\server\user\inputdir" -out "\\server\user\outputdir"
Another typical case is, when you want to create a single documentation for files in more than one directory. In this case you can specify more than on director in the -in parameter, separated by your operating system typical path seprator (e.g. ";" for Windows, ":" for Unix).
java -jar ProgDir/AutoDoc.jar -in "C:\input;D:\input" -out "C:\output"
In this Windows example it uses both directories "C:\input" and "D:\input" as input directories. This is usefull, if your files are scattered all over several locations and you want to make a whole documentation site.Of course, the output directory must only contain one entry, because we always have one single output for all the documentation.
If not file type extensions are specified, AutoDoc always scans all files it finds in the input directory and all its sub-directories. This can be a lot of files and usually its only necessary to search for files with a certain extension, like "sas" for SAS programs oder "c" for C-programs.
java -jar ProgDir/AutoDoc.jar -in "input" -out "output" -ext "sas"
This example searches only for SAS programs and creates the documentation only for those. It is also possible to search for more than one extension, by separating them by commas, as in the next example.
java -jar ProgDir/AutoDoc.jar -in "input" -out "output" -ext "sas, java"
Here, SAS and Java programs are documented.
The standard beginning of a markup block is defined in the file "res/AutoDocFileExtensionDefaults.txt". If it is not find there, "/*!" is used for the begin of a markup block and "*/" for the end of the markup block. Borders can be drawn with * and the standard quoting character is """.
The parameter -extdef can be used to overwrite the these defaults from the "res/AutoDocFileExtensionDefaults.txt" file. But this parameter is deprecated now. It will be removed in future releases.
With the -exclude parameter a pattern can be specified to exclude files from being processed. For example with -exclude "*Old*; */Temp/*" everything containing "Old" and everything in a sub-directory of "Temp". More than one pattern can be specified, separated by the operating systems path separator (e.g. ";" on Windows, ":" on Unix).
Normally, AutoDoc processes all the directories from the -in and their sub directories. Sometimes, the recursion of the directories is not desired. Therefore, this behavior can be switched off by the -recurse parameter. For example
java -jar ProgDir/AutoDoc.jar -in "input" -out "output" -recurse "no"
processes only the "output" directory and ingnores it's sub directories.
The output type can be specified by the option -outtype. There are several types ouf output possible, depending on the users requirements:
If the -outtype is omitted, the default output type is "itreeframes".
With the option -title one can specify an overall title for the documentation. This title appears as heading in every output file.
The output language can be specified by the option -locale. The default is "en", the ISO 639-1 language code for english output. Currently supported languages are "en" (English) and "de" (German). The language specific settings are read from the res directory of the program folder. The section Resource Directory (-res) describes, how to extend AutoDoc to support additional languages.
Please note, that the ISO 639-1 language codes contain only two characters and have to be in lower case letters for AutoDoc to detect them correctly.
By specifying a project name to the -chm parameter, one can switch on the output of project files for the MicrosoftTM Help CompilerTM or MicrosoftTM Help WorkshopTM. These files can then be used with this software to generate compiled help files (CHM) from the HTML output. For example
java -jar ProgDir/AutoDoc.jar -in "input" -out "output" -chm "AutoDoc"
will generate the files AutoDoc.hhp, AutoDoc.hhc, and AutoDoc.hhk needed to generate the compiled help file AutoDoc.chm using one of the MicrosoftTM compilers.
This output type creates a framed output with two frames. The left frame contains an index of the contents in a simple tree list. The tree list is static and not changeble. It has two main sections.
The file "index.htm" is the main frame file, "AutoDoc_List.htm" the index tree, "AutoDoc_Index.htm" the starting page with a simple file index and "Autodoc_xxx.htm" the individual documentation for each file.
First, the output is grouped by the file type (program, library, etc.). Then the index is grouped by special groups defined in the markup. The output looks like in the following screenshot.
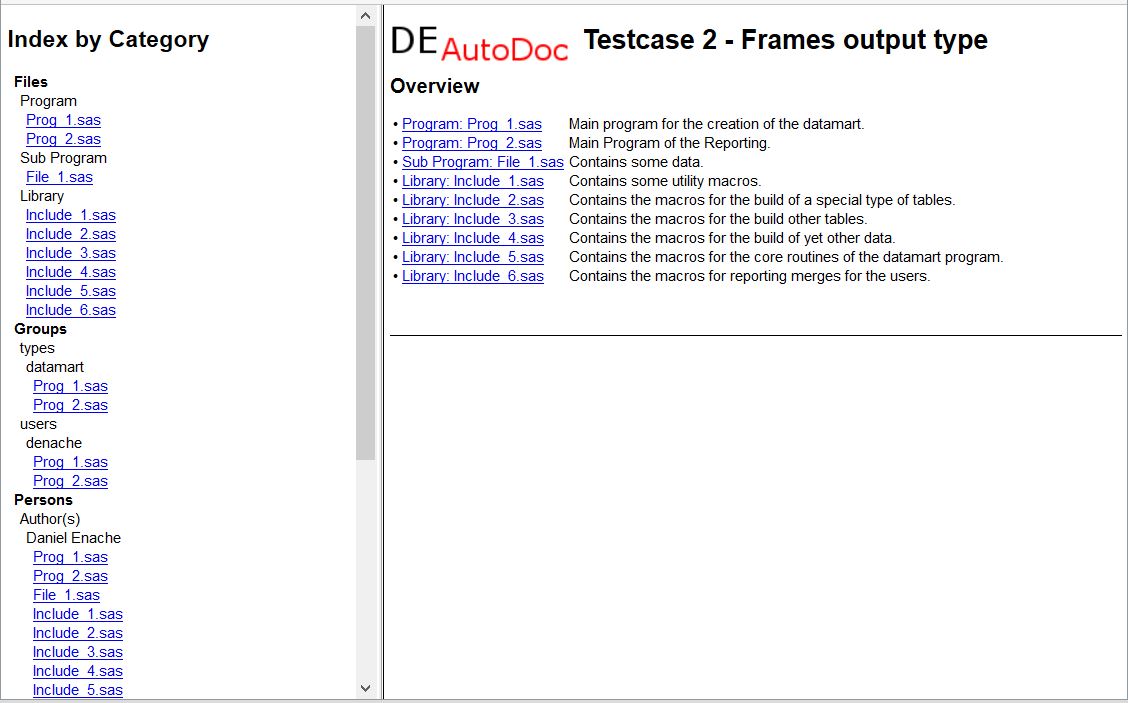
This output has been achieved by the following command:
java -jar ProgDir/AutoDoc.jar -in "input" -out "output" -outtype "frames"
This output type creates a framed output with two frames. The left frame contains an index of the contents in a tree list. The tree nodes of the list can be expanded and folded dynamically. For this functionality, JavaScript has to be enabled in the users browser. It has two main sections.
The file "index.htm" is the main frame file, "AutoDoc_List.htm" the index tree, "AutoDoc_Index.htm" the starting page with a simple file index and "Autodoc_xxx.htm" the individual documentation for each file.
As in the framed output, the output is first grouped by the file type (program, library, etc.). Then the index is grouped by special groups defined in the markup. The output looks like in the following screenshot.
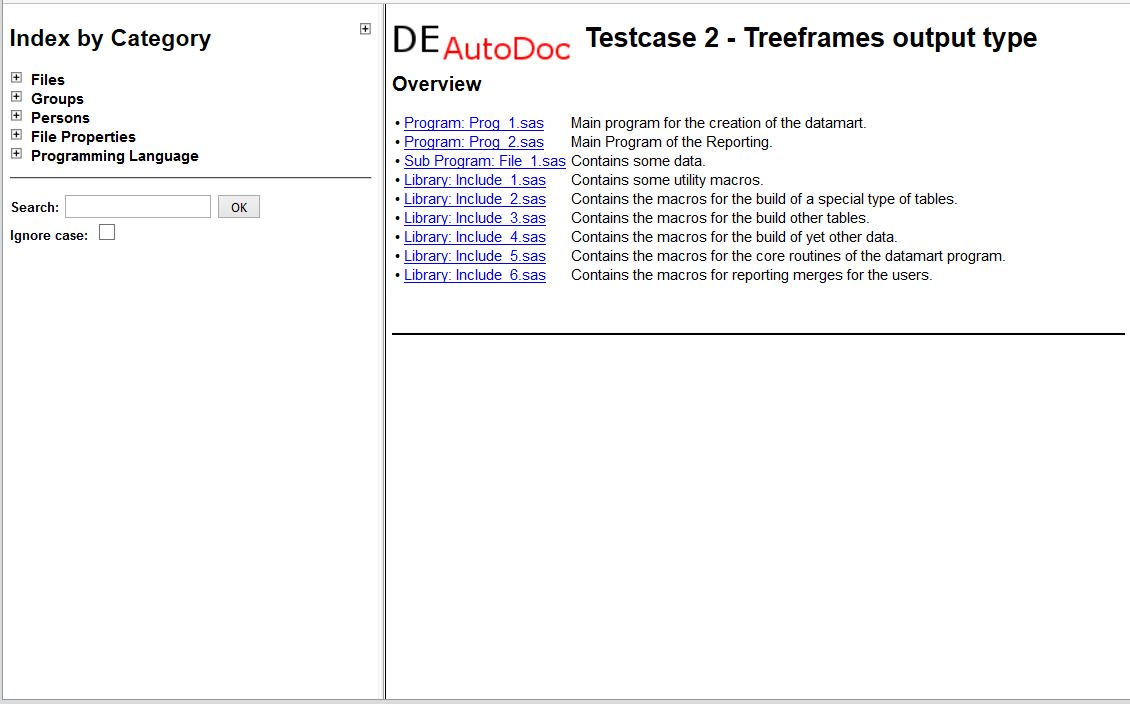
This output has been achieved by the following command:
java -jar ProgDir/AutoDoc.jar -in "input" -out "output" -outtype "treeframes"
This output type creates a framed output with a main window and two internal frames (iframes). The main window contains a header on top, an index of the contents in a simple tree list on the left side and the content on the right side. The tree list is static and not changeble. It has two main sections.
The file "index.htm" is the main window file, "AutoDoc_List.htm" the index tree, "AutoDoc_Index.htm" the starting page with a simple file index and "Autodoc_xxx.htm" the individual documentation for each file.
First, the output is grouped by the file type (program, library, etc.). Then the index is grouped by special groups defined in the markup. The output looks like in the following screenshot.
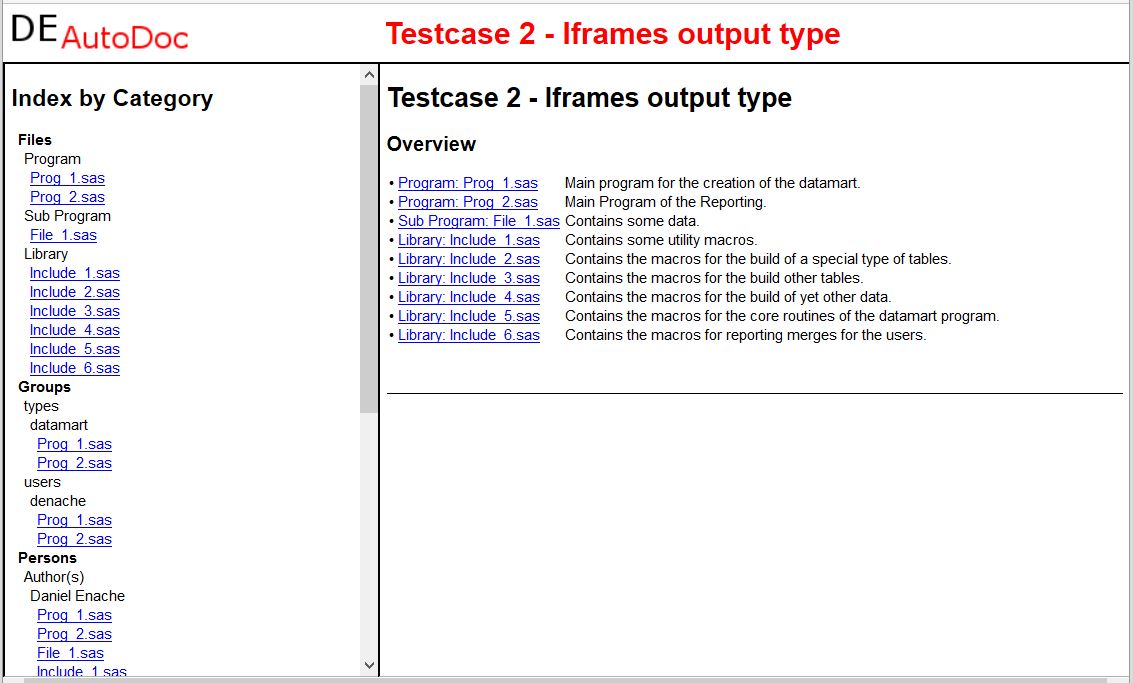
Here, additionally a logo has been specified by the -logo parameter. This output has been achieved by the following command:
java -jar ProgDir/AutoDoc.jar -in "input" -out "output" -outtype "iframes" -logo "mylogo.jpg"
This output type creates a framed output with a main window and two internal frames (iframes). The main window contains a headeron top, an index of the contents in a tree list on the left and the content on the right side. The tree nodes of the list can be expanded and folded dynamically. For this functionality, JavaScript has to be enabled in the users browser. It has two main sections.
The file "index.htm" is the main window file, "AutoDoc_List.htm" the index tree, "AutoDoc_Index.htm" the starting page with a simple file index and "Autodoc_xxx.htm" the individual documentation for each file.
As in the framed output, the output is first grouped by the file type (program, library, etc.). Then the index is grouped by special groups defined in the markup. The output looks like in the following screenshot.
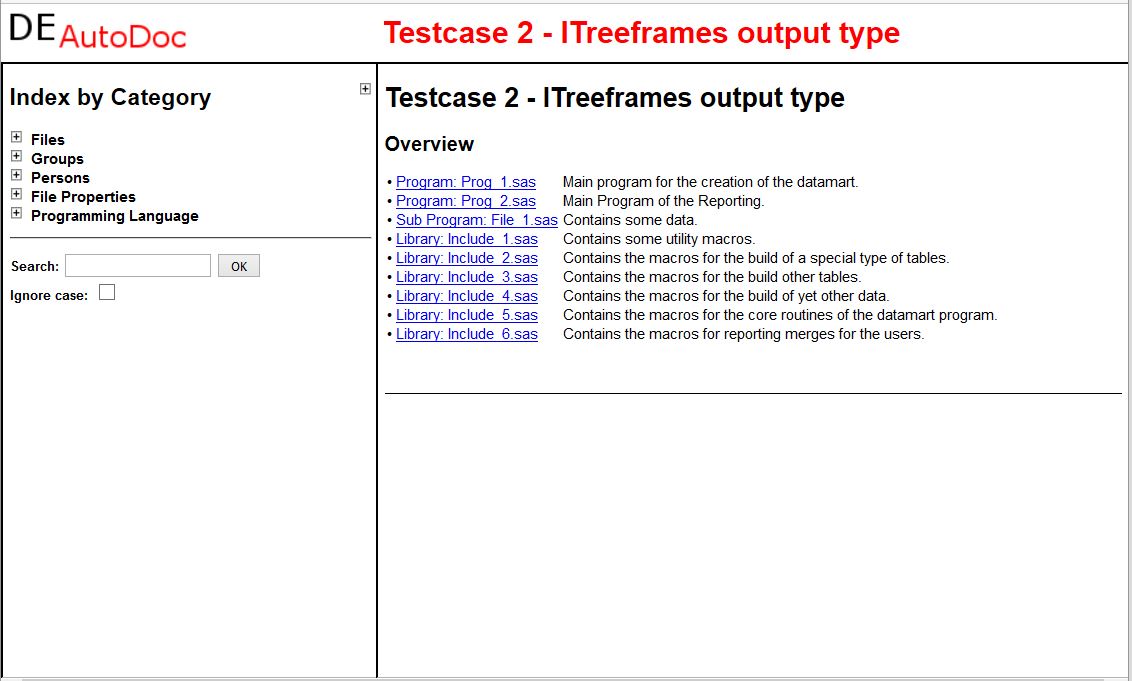
Here, additionally a logo has been specified by the -logo parameter. This output has been achieved by the following command:
java -jar ProgDir/AutoDoc.jar -in "input" -out "output" -outtype "itreeframes" -logo "mylogo.jpg"
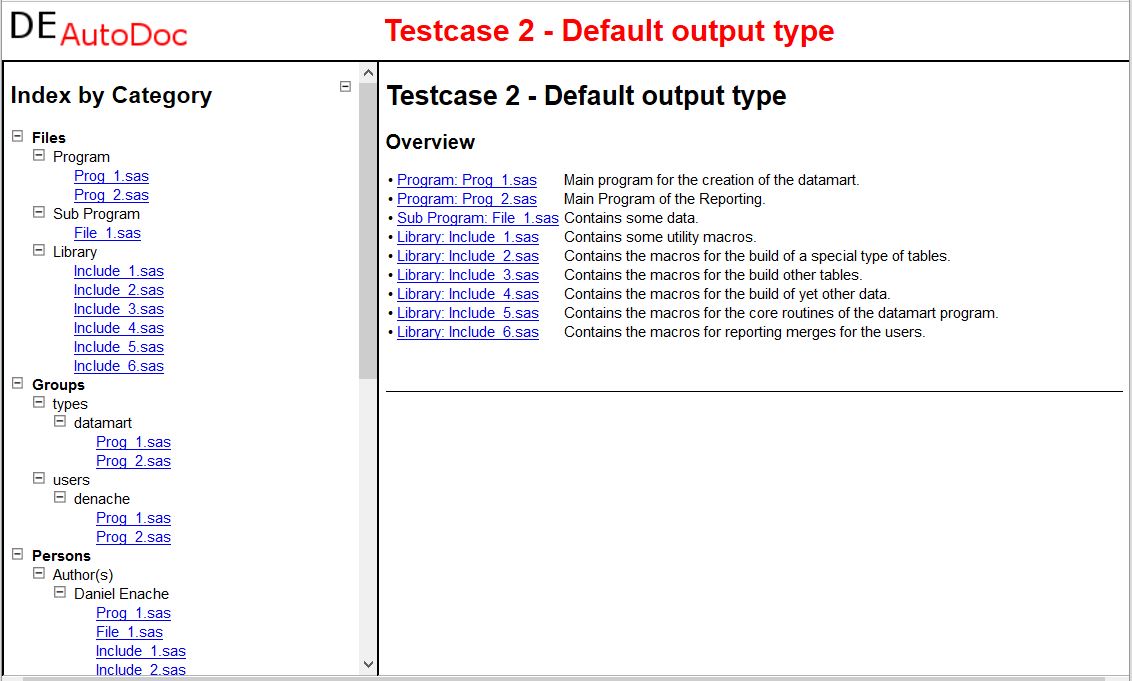
This output type creates a multi file output without frames. The main file "index.htm" contains the index and the files "Autodoc_XXX.htm" the documentation of each file.
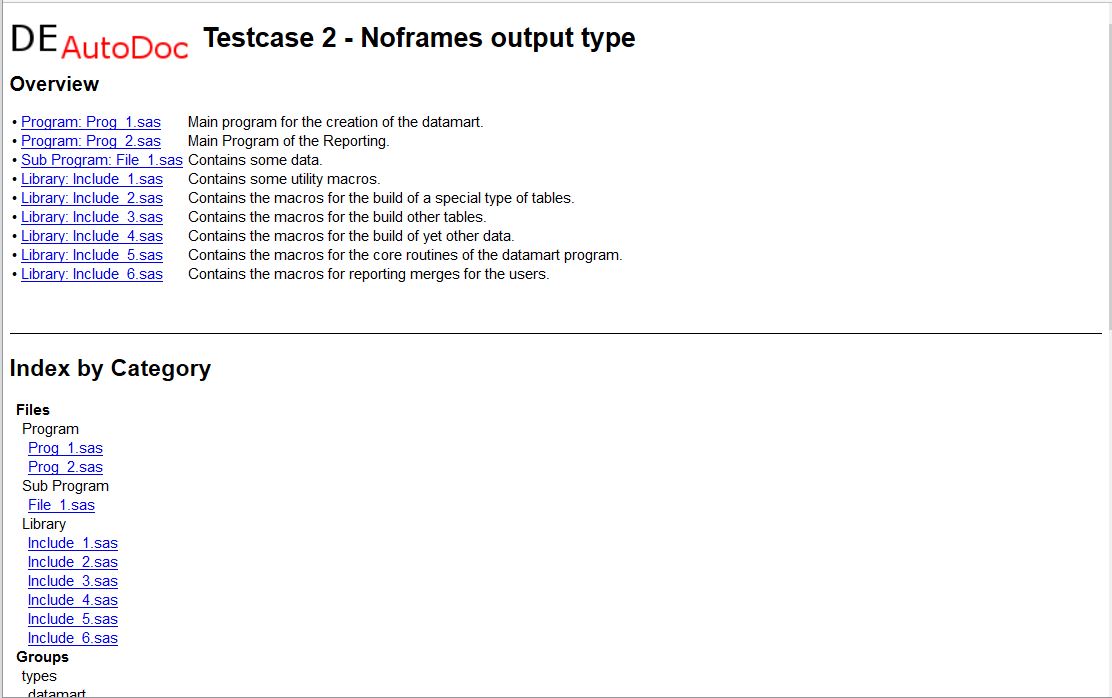
This output has been achieved by the following command:
java -jar ProgDir/AutoDoc.jar -in "input" -out "output" -outtype "noframes"
This output type writes the whole documentation in a single output file "index.htm". This is useful, if the user requires a single document to be imported into a word processing software, like Microsoft Word or Open Office Writer.
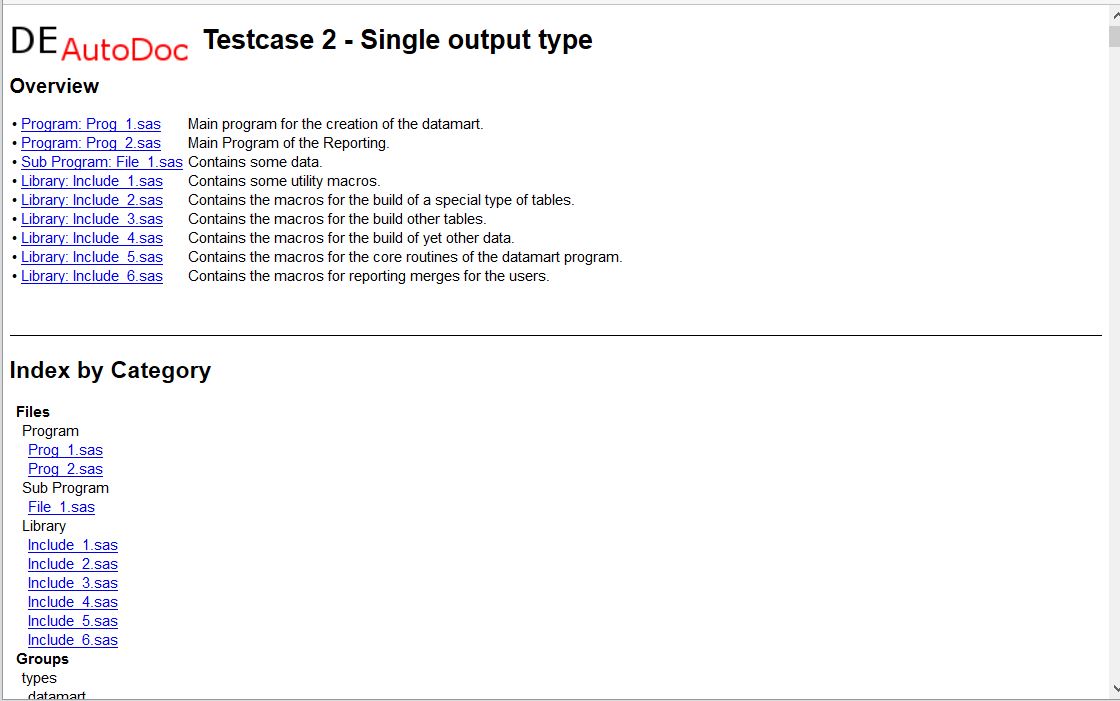
This output has been achieved by the following command:
java -jar ProgDir/AutoDoc.jar -in "input" -out "output" -outtype "single"
This output type creates LaTeX documentation. LaTeX documentation is only tested with mikTeX and is currently experimental.
The following LaTeX packages are required to compile the output with LaTeX:
As opposed to HTML output, the -styledef parameter points to a LaTeX class file instead of a CSS file.
This output type creates PDFLaTeX documentation. PDFLaTeX documentation is only tested with mikTeX and is currently experimental.
The following LaTeX packages are required to compile the output with PDFLaTeX:
As opposed to HTML output, the -styledef parameter points to a LaTeX class file instead of a CSS file.
This output type creates an E-Book in epub format with the documentation. This output type is currently experimental.
If a logo image is provided by the -logo parameter, the logo is used as cover image on the title page.
For the HTML output types using frames ("frames", "treeframes", "iframes", and "itreeframes") a possibility of full text search is included in the output.
The search functionality is disabled by default, because it generates a search helper file "Autodoc_SrcIdx.htm" containing the complete documentation text of all output files and therefore almost doubles the disk space used by the output. However, using -enablesearch "yes" enables the search functionality.
On the left side underneath the index tree, a search string can be entered and it can be chosen, whether the search is case sensitive or not.
The search only works in compatible browsers (Internet ExplorerTM and FirefoxTM), because other browsers assume, that the access to the search helper file is a cross-site scripting attempt, and therefore block the access. However, it may work in those browsers if the AutoDoc output is on a web server and accessed via the http protocol.
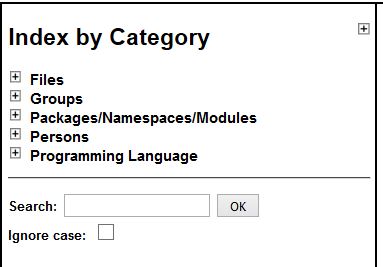
The results are listed unterneath. During the search the text "Search in progress..." is shown. When this text dissapears, the search is finished.
With this parameter it is possible to change the system's current working directory for the AutoDoc run. The current working directory depends heavily on the operating system on which AutoDoc is running. If AutoDoc is started from a batch file by double clicking the batch file, it is usually set to the location of the batch file. This parameter enables the user to explicitly specify the working directory. Path's specified in the -in, -out and similar parameters are interpreted relative to this working directory.
Usually, AutoDoc uses the CSS stylesheet "Autodoc.css" for HTML output, which is provided in the "templates" sub-directory of the intallation path.
For LaTeX output, it points to a LaTeX class file (*.cls). The default is "article.cls", which is provided by the standard LaTeX installation.
During the program run the standard CSS file is copied into the output directory, unless there is a copy of the style definition file (CSS or LaTeX class) in the res directory.
However, sometimes the used wants a different look of the documentation. He can simply make a copy of the original file "Autodoc.css" and change the different styles as desired. The parameter "-styledef" enables the inclusion of such a stylesheet file, as in this example.
java -jar ProgDir/AutoDoc.jar -in "input" -out "output" -styledef "templates/mytemplate.css"
Sometimes, the user wants to insert additional code to the header of the HTML output, for example to insert JavaScript code, Meta-Tags or additional Style Sheets. This can be achieved by the "-headins" parameter. You can name a HTML file (e.g. "Head.htm") which is the inserted between the <head> and </head> tags of the HTML output.
java -jar ProgDir/AutoDoc.jar -in "input" -out "output" -headins "templates/Head.htm"
Note, that the insertion point of the code will be after the <title> definition and after the AutoDoc stylesheet inclusion to not interfere with the defined Autodoc logic.
The same happens with LaTeX input files. They should have the file extension *.tex.
With the -logo parameter, a user supplied logo image can be incorporated into the head of the documentation. This way it is possible to create an own corporate identity design. With the current settings for the size of the header in the style definition file Autodoc.css the maximum height of the image for iframes and itreeframes output is 36 pixel.
For HTML output, any picture file type valid for HTML can be used, e.g. *.jpg, *.gif, *.png. However, the file formats which can be uesd for LaTeX may differ depending on the LaTeX implementation. For mikTeX for example, both latex and pdflatex options work with *.jpg and *.gif is not supported.
If a logo with more than 36 pixel is to be used, the height property of the div#Head settings in Autodoc.css has to be modified. The recommended way to do this is to make a copy of the Autodoc.css, modify this copy and the supply the file name of the modified file via the -styledef parameter.
You can create your own template directory and place templates, like the Autodoc.css file or other template files into it. Using the templatedir parameter instructs AutoDoc to use these templates instead of the default templates (which are stored in the templates sub-folder of the program driectory).
If this parameter is specified, all templates are first searched in this directory. If they are not found there, the default templates in the program's templates sub-folders are used instead.
Since version 1.0.3 you may also create a res folder into the template directory. All files contained in the res folder are also copied into the output directory. This enalbles you to add additional files, like logo images, to the output.
Although parameters can be provided in the comman line, it may be convenient to store the most commoly used parameters in a separate configuration file. Especially, since the maximum length of the command line may be limited on some operating systems.
As described before, the configuration file is a simple text file. Each parameter is on one line and the parameter name and the corresponding setting are separated by a =. The names of the parameters are the same as on the command line but without the dash (-). The individual parameters are not to be enclosed by quotes and must be keept in a sinlge line of the file. Here is an example configuration file.
in=input/Java_1; input/Java_2
locale=en
outtype=Treeframes
ext=java
extdef=java, /**//*, *//**/, *, \", Java
templatedir=
res=
css=
title=
headins=input/templates/Head1.htm
footins=input/templates/Foot1.htm
logo=
If parameters are set in the configuration file as well as on the command line, the command line overrules the settings of the configuration file. This way it is possible to keep standard settings in the configuration file and only change the project specific options on the command line.
With parameter -res, it is possible to change the AutoDoc resource directory, where it looks up the Tag Dictionary and the language files. One can simply copy the resource directory to a different location, modify it and point to it via this parameter. This is an easy way of adding new Tags and redefine exisitng tags.
Warning: The author of AutoDoc is not reliable, if modifying these system files lead to unsuspected results.
The recommended way of modifying ressources, is to make a copy of the complete res folder, modify the copy and the point to it via the -res parameter. When a new AutoDoc release is installed, the changes made to the res folder by the installation have to be applied to the copy as well.
There are three types of files in the resource directory:
If the ressources are modified as desribed above by pointing to them via the -res parameter and a new AutoDoc version is installed, AutoDoc is able to detect if the message texts and the dictionary are out of synch. If the message texts are out of synch, an error message is displayed and the program is terminated, because they are critical for the execution. If the tag dictionary is out of synch, only a warning is issued and the program execution is continued. In this case the program may terminate successfully or not depending on the tags used in the project.
By adding different language folders as sub directories of the resource folder, like the already exisiting en and de folders, and using the -locale option, it is possible to generate output in different languages. The folder names should be taken from the ISO 639-1 language codes.